Features of Urban Poling Activator2 Poles
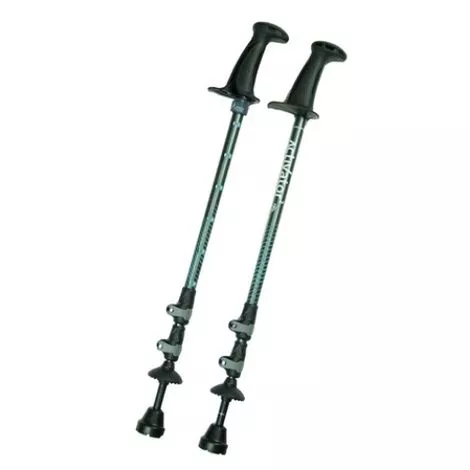
- Bell shaped tip for stability
- Wide ledge instead of a strap to minimize the risk of injuries
- FDA registered Activator walking cane
- Patented ergonomic Coregrip designed for core strengthening while reducing strain on the wrist
- Anti-vibration features to minimize stress on joints
- Adjustable for users heights up to 6’4″ (193 cm)
- Trekking baskets
- Flip and button lock – 225 lb (102 kg) of weight-bearing capacity per pole
- 3-sectional and collapsible for travel – 20% shorter than 2 sectional poles to 25” (63 cm) vs 29″ (73 cm)
When to use these Canes?
Activator2 is ideal for users with the following health conditions:
- Pre/post hip surgery
- Knee surgery
- Parkinson’s
- Stroke
- Multiple sclerosis
- Pain management
- Soft tissue injuries
- Cancer rehab
- Spinal conditions and older adults
What to buy with Walking Canes
- Complete Medical Cane And Crutch Rack
- Drive Cane And Crutch Holder
- Premium Hip Kit
How to adjust Activator2 Cane?
- Extend poles: Open both flip-locks tabs (grey). Pull below the flip-lock to extend the middle and lower sections. The lower section may be stiff to pull initially.
- Set pole length: Adjust the pole length so that you can stand with your elbow bent at slightly less than a 90-degree angle with your hand resting on the ledge of the CoreGrip and the bell tip resting on the ground.
- Secure button lock A-B: Looking at holes A and B in the middle section, turn the lower section of the pole until you see the white stripe in the holes marked A and B. Pull on the lower section of the pole until the button locks into holes A or B.
- Secure button lock 1-6: Repeat above securing the button lock in one of the holes marked 1-6 (depending on the appropriate level for your height) in the upper section. Confirm pole length and close flip-lock tabs. Collapsing: open the flip-lock tab, push the button lock, and at the same time push in the section Close flip-lock tab.
How to walk using the Activator Cane?
- Take hold of your poles:
- Make sure that the CoreGrip (handle) with the letter “R” is in your right hand and the pole CoreGrip with the letter “L” is in your left hand.
- Hold onto your poles with an easy grip, making sure your hands go all the way around the CoreGrip.
- Stand tall and place your elbows at your sides at a 90-degree angle.
- Ensure the poles are always completely vertical. Keep your elbows bent the entire time you are walking.
- Begin walking:
- Step forward with the poles and walk in the same manner as regular walking: swing your right arm forward (with your elbow bent at 90 degrees) as your left foot steps forward.
- Keep the poles vertical and in front of your body at all times.
- Be sure that your upper arms swing forward and backward from the shoulders (not elbows) like pendulums.
- Check your posture and grip
- Don’t grip the handles too tightly. Instead, press down on the Ledge with the outside edge of your hand to engage your upper body and core muscles and increase your stability and balance.
- Significant off-loading of weight into the poles will only occur if you are applying a downward force to the Ledge.